How to Add Ads to Your Website: Step by Step: In this guide, you will learn how to add ads to your website to earn money from advertisers.
This tutorial will show you step-by-step how to place Google ads on your website using two methods: Google AdSense and the Ezoic display ad network. The instructions you’ll find below can also be applied to any ad network that runs display ads for website publishers since the ad setup features are mostly the same.
If you want to display Google ads on your website so you can monetize your blog and get paid from display ad revenue, this guide has everything you need to get started with this profitable digital marketing strategy.
How to add ads to your website
1. Set up your website for ads
The first step to how to place ads on your website and get paid is to properly set up your website for ads. This means that your website should be live, accessible online, and have plenty of content for the ad review team to review for compliance.
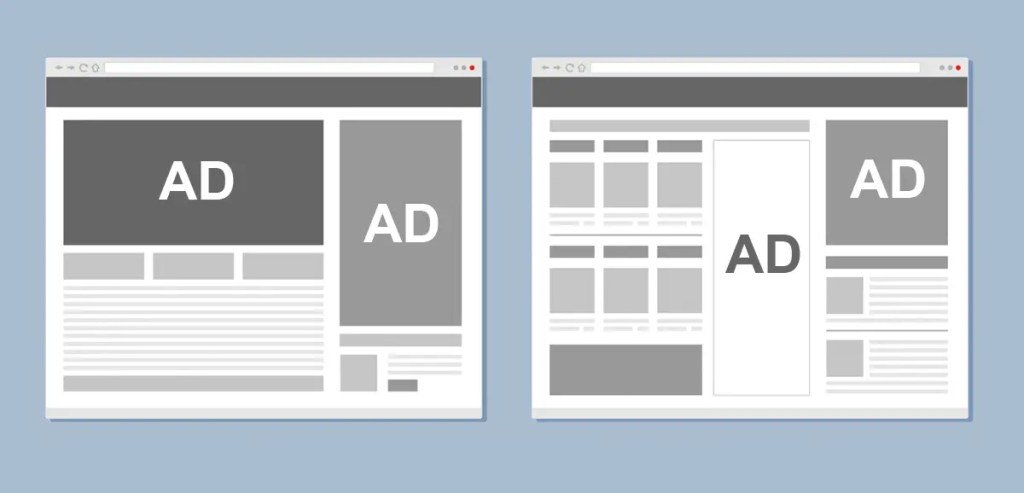
You also want to make sure that your website has at least one sidebar because this is a prime area to place ad code to display ads to your audience.
Additionally, the longer your content is, the more money you can make from ads. So, you should have at least 1,000 words of high-quality content on each webpage to earn a decent amount of revenue from display ads. (Ideally, you’ll need 2,000 words or more to show more ads on the page.)
2. Make sure your site is compatible.
The next step in how to add ads to your website is to make sure it is compliant before applying to the ad network. Google and other advertising platforms don’t just accept any website into their programs. Your site must meet the eligibility requirements to be considered.
Advertising compliance requirements typically include:
- Do not provide copyrighted material/downloads.
- Do not provide pirated content.
- Reliable traffic sources.
- Sites should not redirect users to unwanted pages, sites, pop-ups, or pop-unders.
- Do not use automatically generated content.
- Do not create blank pages with no original content.
- Do not use content copied from other web pages.
- Not keyword stuffing.
- Do not use adult, dangerous or offensive content.
- Do not submit content related to alcohol, tobacco or healthcare.
- Do not use offensive or threatening content.
- Do not use illegal content.
- Gambling content complies with Google's Gambling Policies.
3. Apply to an ad network
The most common way to place ads on your website is to apply to an advertising platform that manages your ad inventory. Two of the best options for this are Google AdSense and Ezoic.
Google AdSense: AdSense is a basic way to display ads on your website and is useful for beginners who want to get started. make some money From their content. (Google pays you 68% of the ad revenue.) You can sign up for AdSense here.
Ezoic: Ezoic It is the next best alternative to AdSense where you can earn between $10 to $40 per 1000 views on average. This is the advertising platform used on SEO Chatter. (Ezoic pays you 90% of the ad revenue.) You can sign up for Ezoic here.
If you want to see more options for displaying ads on your website, check out the next section of this guide titled: “How do I add ads to my website without AdSense?” But the preferred methods are Google and Ezoic.
4. Place ads on your website.
After you are accepted into an ad network, the next step on how to add ads to your website is to place the appropriate HTML code on your site (Google AdSense) or connect your website's DNS to the platform (Ezoic).
In order for ads to appear on your website, the advertising platform must be able to insert ads into your content. The only way to do this is to use JavaScript code or redirect user traffic through name servers.
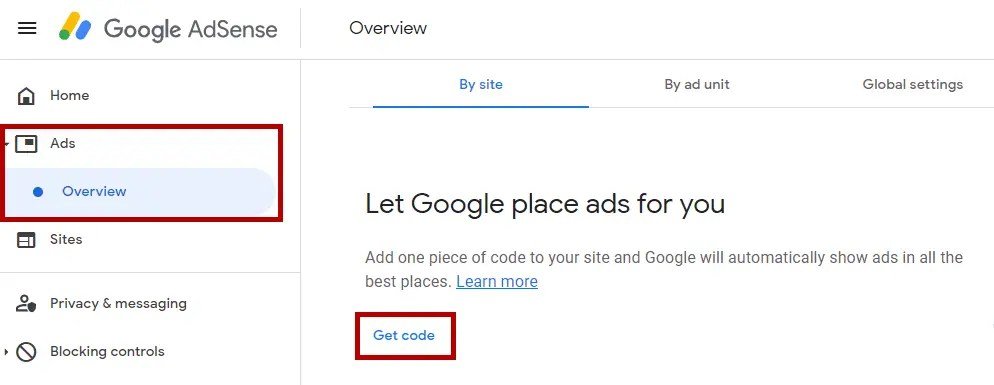
If you use Google AdSense, follow these steps to add Google Ads to your website:
- Open your AdSense dashboard.
- Click on “Ads”.
- Click on “Overview”.
- Click on the “Get Code” link.
- Click the “Copy Code Snippet” button.
- Paste the copied AdSense code between the tags on your website.
- Check out our AdSense code implementation guide. For more details.

If you are using Ezoic, follow the steps below to add each type of ad to your website. Note: Ezoic has a mediation feature that allows you to link your account to Google AdSense. This makes AdSense compete for ad space on your website, meaning the advertiser who bids the highest wins and you get paid the most whether it is AdSense or not. This is another great reason to sign up for Ezoic is here.
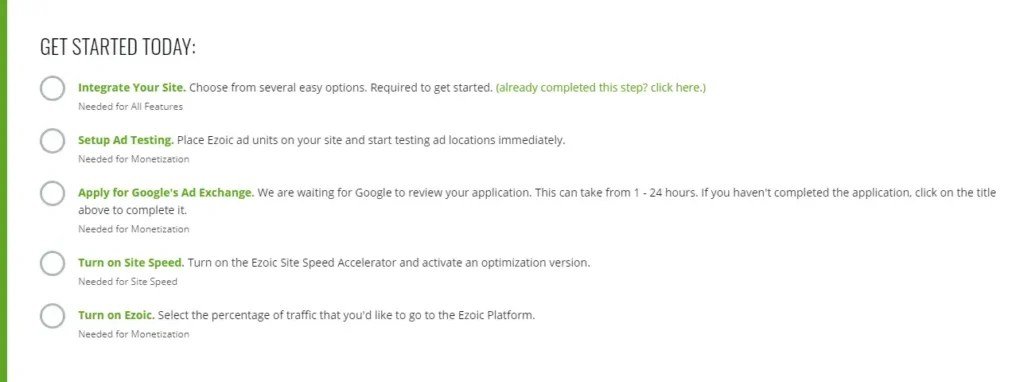
- Open your Ezoic control panel.
- Follow the steps in the setup wizard (example image below).
- Click “Integrate your site”.
- Select the “Cloud Integration” option.
- You will see a table with your current nameservers on the left and the custom Ezoic nameservers created for your site on the right.
- Update your site's nameservers through your domain registrar (or host) to Ezoic's nameservers.
- Click the “Enable Monetization” button at the top of the Monetization menu in your dashboard.
- Follow the steps in the “Set up an ad test” section.
- Install the plugin Ezoic WordPress Free (if running WordPress). Use it to automatically place ad placeholders on your website. Otherwise, install the plugin Ezoic Chrome To manually add placeholders to your web pages to display ads.
- Check out the Ezoic Ads Testing Getting Started Guide For more details.

5. Choose your ad types
Choosing the right ad types is an important part of the process of placing ads on your website and getting paid. AdSense and Ezoic, as well as some other ad networks, allow publishers to control the types and sizes of ads displayed on their sites.
Here's how to choose the type of Google ads on your website:
- Open your AdSense dashboard.
- Click on “Ads”.
- Click on “Overview”.
- Click on the “By Ad Unit” tab.
- Click on the ad type: Display ads (most commonly used), In-feed ads, In-article ads, Multipex ads, or Search engine ads.
- Name the ad unit.
- Choose the ad size: responsive or static.
- Click the “Create” button.
- Copy the code snippet if you're manually adding ads to your website. Otherwise, simply let Google's Auto Ads feature place them on your site for you.
Here's how to choose Ezoic ad types:
- Go to your website.
- Log out of your site's administration dashboard.
- Go to a web page or blog post.
- Open the Ezoic Chrome extension.
- Click “Activate Placeholders”.
- Find the placeholder for which you want to change ad types.
- Click on the ad placeholder name to open the drop-down menu.
- Click on the “Edit” button.
- In the pop-up menu, click the “Sizes” icon.
- Select and deselect the ad sizes you want to appear in this ad placeholder.
- Repeat this process for all placeholders on the page.
6. Adjust your ad settings.
After following the steps to add ads to your website, the next thing you'll want to do is adjust your ad settings to balance revenue and user experience (UX).
Google AdSense offers the following ad settings:
- Automated ads: With this feature turned on, Google will automatically show ads across your website or blog in the best places to drive AdSense revenue. When turned off, you'll need to manually add AdSense code across each webpage.
- In-page ads: These ads appear within the main text of the content on your web pages allowing more ads to appear to increase revenue.
- Multiple ads: These are network-based ad units that display content recommendations. They are also called “native ads.”
- Static ads: These are ads that stick to the bottom of a website and continue to appear as the user scrolls through the page.
- Half-image ads: These are full-screen ads that appear between page loads.
- Ad download percentage: This feature allows you to control the number of ads that load on the page (e.g. minimum or maximum).
- Excluded pages: This feature allows you to exclude certain pages from having ads appear on them. This means that you will not earn any money from AdSense for those page views.
Ezoic offers these ad settings:
- Improvement goals: You can choose between balanced user experience, revenue, or.
- Ad rate per device: This allows you to change the percentage of ads shown on each device (1-100%) for desktop, tablet, and mobile.
- Original ads: By running native ad units, you can see an estimated 10% increase in revenue.
- ResizeEzoic monetization can increase by up to 23% when you turn on adaptive scaling for your ads where multiple ads can be displayed in a single placeholder.
- Video ads: This feature requires you to upload a video to your account, which can then be placed on your website to accept pre-roll, mid-roll, and post-roll ads.
- AI placeholders: With AI placeholders enabled, you can see Increase in EPMV profits By 20%.
- Fixed sidebar ads: With this feature enabled, you can add a floating sidebar ad to your website which can increase Ezoic EPMV by 10%.
- Half-image ads: Vignette ads appear between web pages as users navigate through your site.
- Static ads: These ads stick to the bottom of a web page as the user scrolls through the content. Ad revenue can increase by 60% when sticky ads run across all devices.
7. Monitor ad performance
To get the most out of your ads, you should monitor their performance over time. This way you can see which ad units are generating the most revenue. Additionally, you can look for more ways to add more ads as mentioned in the next step.
You can track your ad performance in Google AdSense by going to “Reports” then selecting “Ad Formats” or “Ad Sizes” and analyzing the data.
In Ezoic, you can track ad performance by opening Big Data Analytics, going to Revenue, and choosing either Ad Placement, Ad Placeholder, or Ad Size to analyze revenue data.
8. Find more ways to add Google Ads
After you place ads on your website, you should: earn money And to get paid as a publisher by advertisers. However, you shouldn’t just accept existing revenue. Instead, you should look for ways to add more ads to your site so you can increase your RPM, or earnings per thousand visitors (EPMV), which are metrics that represent amount of money Which you earn for every 1000 page views.
More ads always equals more money for the publisher. So try to place additional ads on each web page while keeping in mind the user experience of the visitors as well.
9. Consider direct advertising deals.
Another way to add ads to a website is to contact advertisers for direct advertising deals.
This method eliminates the middleman (i.e. ad networks, ad exchanges, affiliate networks), and allows publishers to make more money by connecting with media buyers directly.
The only downside here is that you have to identify these types of advertisers yourself and negotiate the terms of the ad placements. However, if you’re willing to put in the work, you can make a lot more money with just a few ads on your website. Plus, if you sign up with Ezoic here, they can help you manage those deals through the platform.
10. Keep your privacy policy up to date
The final important part of this process is to update your privacy policy. This step is required by most ad networks and ad exchanges to keep your website compliant with their company policies and Google Ads policies.
Most advertising platforms can manage your site's privacy policy for you to make sure it's up to date and compliant, but if you're doing anything outside of those platforms, such as securing a direct advertising deal, you'll need to include language about those relationships and how they affect your site's visitors on your site's privacy policy page.
Additionally, once you have Google ads on your website, you need to make sure that your site remains compliant with Google’s advertising policies whether you use a platform like AdSense, Ezoic, or any other platform. Otherwise, Google will stop showing ads on your website and may close your AdSense account if you violate the terms of the policy.
Should I add ads to my website?
You should add ads to your website if you have published a decent amount of quality content and your website is getting around 100 organic visits per day. Adding ads to your website can help you monetize your traffic and get paid by advertisers who want to reach your audience.
Placing ads on your website allows you to generate revenue from display ads that come from millions of advertisers competing for your ad space. This means you can earn more money from Google Ads and other ad providers by placing more relevant ads on your website that match the interests of your site visitors.
The only time you don’t want to have ads on your website is when you’re trying to get a conversion on a specific landing page (i.e. convert a visitor into a lead, customer, or sale). In this case, the conversion is more important than ad revenue. Therefore, you should turn off ads on those individual pages so that the ads don’t distract from your conversion goal.
If you like the idea of getting paid from ads, I invite you to sign up with Ezoic here to get started on this platform.
How much can you make by placing ads on your website?
You can earn $0.20 to $15 per click by placing ads on your website and $8-40 per 1000 CPM (cost per thousand impressions) on average. The amount you earn from ads depends on the category of the website, the type of content, the volume of traffic, the location of the user and the placement of the ad.
Check out these related pages that give you specific details about how much AdSense pays per 1,000 views and how much you Ezoic pays for it 1000 views.
How can I add ads to my website without AdSense?
You can add ads to your website without AdSense using the following ad networks:
- Adbuff
- AdClickMedia
- AdRecover
- Adsterra
- Adversal
- Amazon Native Shopping Ads
- Bidvertiser
- BuySellAds
- Evadav
- Ezoic
- Info Links
- Sovrn //Commerce
- Skimlinks
- MadAds Media
- Media.net
- Monumetric
- PropellerAds
- PopCash
- PopAds
- RevContent
- SHE Media
- ylliX

Summary of how to add ads to your website
I hope you enjoy this guide on how to add ads to your website. To make money From image ads.
As you’ve discovered, placing Google ads on your website can be done in two main ways: using Google AdSense or an ad network like Ezoic. Once you have ads on your website to monetize your blog content, there are multiple ways you can increase ad revenue to get paid for your content by adjusting different settings on the platforms.


It is the best time to make some plans for the future and it is time to be
happy. I’ve read this post and if I could I desire
to suggest you some interesting things or suggestions.
Maybe you could write next articles referring to this article.
I want to read more things about it! https://menbehealth.wordpress.com/
It is the best time to make some plans for the future and it
is time to be happy. I’ve read this post and if I could
I desire to suggest you some interesting things or suggestions.
Maybe you could write next articles referring to this article.
I want to read more things about it! https://menbehealth.wordpress.com/
Для достижения максимальной эффективности важна правильная работа с xrumer https://www.olx.ua/d/uk/obyavlenie/progon-hrumerom-dr-50-po-ahrefs-uvelichu-reyting-domena-IDXnHrG.html, учитывающая алгоритмы поисковых систем.
MetaMask Download changed my crypto experience. Managing tokens has never been easier. A must-have for anyone in the space.
MetaMask Download is super quick. The wallet’s design is simple yet powerful, making it ideal for beginners and experts alike.
MetaMask Extension makes DeFi so easy. I can lend, borrow, and swap tokens seamlessly with full control over my funds.
MetaMask Extension is my go-to crypto wallet. It offers top-tier security and integrates well with all major dApps. A game-changer!